Photographing English Cathedrals
From depth of field to dedication to detail, Peter Marlow’s technical notes reveal how his project photographing every cathedral in England was as much a labor of love as it was skill
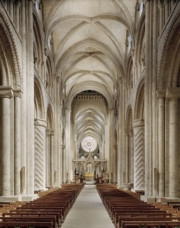
In 2008, Peter Marlow was commissioned by Royal Mail, on the occasion of the 300th anniversary of the completion of St Paul’s Cathedral, to photograph six cathedrals. The resulting images of Lichfield, Belfast, Gloucester, St David’s, Westminster, and St Magnus in Orkney were issued as a set of six commemorative stamps and a miniature sheet. Once the commission was complete, however, Marlow was inspired to continue the project and in the following four years shot all 42 of the cathedrals of the Church of England.
This endeavour can be viewed as a contemporary update to tradition of church photography in England, particularly the work of Frederick Evans and Edwin Smith. Taken in natural light at dawn, these remarkable images capture the luminosity of each interior as daylight emerges from behind the altar. Martin Barnes, Senior Curator of Photographs, Victoria and Albert Museum said, “Marlow captures the intangible essence of all form that is generated by creative force: the enduring mystery of space within space.”
"Marlow captures the intangible essence of all form that is generated by creative force: the enduring mystery of space within space"
- Martin Barnes, Senior Curator of Photographs, V&A
As this body of work tours the United Kingdom, to be exhibited in cathedrals, we revisit the technical note that reveals a labor of love as much as skill. The below is Marlow’s original note, as published in the Merrell book The English Cathedral.
In my work for this book, the preparation was everything. Although I had decided that the right approach was to photograph with all the lights off, it was very difficult to convince the administrators at each cathedral to let me do it. It required a vast number of telephone calls and follow-up emails for them to give me access before sunrise and to arrange for staff to come in early.
For the set of Royal Mail stamps I photographed in 2007, I used a 6 x 7 Mamiya RZ camera with a 75 mm shift lens to control perspective, with Tri-X Kodak black-and-white film. When the project developed into shooting all forty-two English cathedrals in color, I decided to increase the film size and quality, switching to a Sinar F1 monorail camera mounted on the largest tripod Manfroto makes. I used a 6-foot stepladder bought from my local hardware shop. Filmstock was Fuji 160 Pro negative color film, rated at 100 ASA.
This was more equipment than I could actually carry, and few cathedrals have public parking spaces near the entrance. I tried to get special permission to park outside the west doors, and even invented a very official-looking parking permit to stick on the windscreen, but if that was not possible I would struggle with one of my US-made Porter Cases, which converted into a handy trolley.
"It was important for me to keep a sense of the relative size of each nave"
- Peter Marlow
It was important for me to keep a sense of the relative size of each nave, since some were enormous and others not. To do this, I used exactly the same elevation on the ladders and tripod, and kept the lens at a constant focal length. After extensive testing at Southwark, I settled on a Sinaron-W 115 mm f6.8 lens, which I used throughout the project. Controlling the vertical perspective was vital, and I used the rising front on the Sinar at its limit to keep all the verticals parallel.
I wanted the whole volume of the space to be in focus, so for most of the images I used a small aperture of between f22 and f32 for maximum depth of field. This required exposures of between one and five minutes. With that length of exposure, reciprocity failure, where the film requires a much longer exposure than is indicated on the light meter, was a big problem. I discovered that Fuji FP 100 Instant film (used for Polaroids) suffered this effect to the same extent as the negative film, and that the aperture setting for a well-exposed Polaroid would be one and a half stops greater than that for the negative film. The exposure meter was essential for monitoring the light levels, which could change quickly with the weather. I would pick a mid-tone point in the cathedral, such as the floor of an aisle, and use it as my reference, although I became increasingly able to use my instinct. By making notes on each exposure I could adjust the aperture as the light changed, keeping the exposure time constant to maintain consistent reciprocity failure.
"For most of the images I used a small aperture for maximum depth of field"
- Peter Marlow
In most cathedrals I used between six and twelve sheets of film, and about five Polaroids. I edited from contact sheets produced by my laboratory, and made a shortlist, which I scanned using an Imacon 848 scanner. At the end of the project I made a final edit of the forty-two images I wanted to use, and my studio assistant scanned them full frame in 16bit format using the Imacon. They were then carefully spotted at 66% using Adobe Photoshop 5, and cropped in a consistent 5 x 4 format to remove the film rebates and processing marks.
During the shooting I was very careful to prepare the image by physically moving any distracting objects, such as posters, prayer books, waste bins and welcome desks. Consequently, with the exception of two cathedrals where we cloned out small emergency ceiling lights that could not be turned off, there was no digital manipulation of the images in Photoshop, other than the standard darkroom methods of spotting, color balancing and tonal adjustment. With no artificial lights this was generally reasonably straightforward, but being so subjective it seemed to take a long time, and was a mentally exhausting process.
We decided to use a PSD format for saving the cleaned-up files, to maintain all these changes in separate layers, so that the process of getting to the final image could be recorded and referred to in case of difficulty achieving a color proof I was happy with. This made the files enormous, sometimes up to 1.5 gigabytes, and meant I had to increase the RAM in my Intel Mac to 12 gigabytes to handle them. The final files were flattened and saved as 16bit TIFs, and passed to the printer for proofing with small 8 x 10 Lamda reference prints for color comparison.
"I was determined to have everything I needed to hand so that I could concentrate on experiencing the space and simply “looking”"
- Peter Marlow
In more than thirty years of photography there have been many times when I was not very well prepared, often lacking a vital piece of equipment. I was determined with this project to have everything I needed to hand, and everything in place in good time so that I could concentrate on experiencing the space and simply “looking”.


